Posts Tagged ‘Android’

Test Cases for Android Apps (Test Cases Regarding External Influence):

Senario no.1

Ensure that the Application works correctly following a memory card insertion action when the Application is suspended and resumed.

Steps to Scenario:

1. Launch the Application.

2. Suspend Application

3. Insert the memory card into the phone, and mount the card.

4. Fill the card to its capacity

5. Unmount the memory card.

6. Resume and operate the Application

Expected Result:

The Application continues to operate as designed based on the Application specification and is not affected by the memory card insertion or mounting/unmounting.

Scenario no.2

Ensure that the Application works correctly during a memory card insertion and removal.

Steps to Scenario:

1. Launch the Application.

2. Insert and remove the memory card.

3. Verify that Application works correctly.

Expected Result:

1. The Application should work correctly following memory card insertion.

2. The Application should work correctly with memory card removed.

Scenario no.3

Ensure that the Application with memory card functional screens works correctly with memory card inserted and removed.

Steps to Scenario:

1. Launch the Application.

2. Navigate to screen where Application works with memory card.

3. Insert the memory card.

4. Verify that Application works correctly.

5. Remove the memory card.

Expected Result:

1. The Application should work correctly following memory card insertion.

2. The Application should work correctly following memory card removal.

Test Cases for Android Apps (Test Cases Regarding Storage):

a) Storage/Cache (verification points)

Go to the Device>Settings> App>

Here, all the Downloaded apps will be listed. It will show the location of app whether its Downloaded on internal memory, SD Card or currently in Running status.

Test Cases for category a):

1. Verify how much memory space (internal/SD Card) occupied by app.

(Occupied space shown just below the App name.)

2. Click on the app> it will redirect to the ‘App Info’ page

(I) we can verify here whether the App name and App version is as per the requirement

(ii) Under ‘Storage’ section:

a) Verify the ‘Total’ space occupied by the App, it should be as per the requirement

b) Verify ‘App’ storage, it should be as per the requirement

c) USB storage app: verify whether it occupies the space as expected

d) Data: verify whether the app uses the defined limit of data while running

e) SD Card: If app is installed in SD Card, very that app occupy as per the expected space

f) Cache: verify that cache space should be as expected (notice the behavior of app if cache space exceeded)

b ) App Storage

Test Cases for category b)

1.On installing the app into device, it should occupy the expected space

2.On moving app to SD Card, it should release the internal memory

3.On uninstalling the app from the device, it should released all the occupied memory (saved files that contain games level, application setting etc should be released)

4.If cache exceeded from expected memory, check the behaviour of app

5.If app provide the upgrade option (like Skype, Facebook etc) then check whether app provide the details of the size which it suggest for upgrading (if device memory will be less and we start upgrading then check whether app prompt the message regarding less memory or app crashes out)

MonkeyTalk all Actions/methods  with their Description and Examples:

MonkeyTalk Action Description Example for android
Device Rotate This method is used for Change the device orientation.
Android:Landscape,Portrait
Ios:Left,Right
Device *  Rotate Landscape
Back iOS: Pops the current UINavigationItem (if there is one)
Android: Presses the hardware device key
Device *  back
forward iOS: Pushes the next UINavigationItem, if there is one
Android: ignored.
N/A on Android.
search iOS: ignored.
Android: Presses the device search key.
Device *  Search
Screenshot This method is used to create screenshot folder in running project and we can capture screenshot at any point Device *  Screenshot
Menu Android: Presses the device menu key.
iOS: ignored
Device * Menu
Shake This method is used for specific apps.  Device * Shake
Get This method returns “iOS” or “Android”. Device * Get a
Table Select This method is used to select an element from the table. Table * Select Boron
SelectRow Select a row.
row – the row to select
section – the section containing the row. (Ignored on Android).
Where row and section are arguments.
ScrollToRow(by row) Scroll to a row by row number.
Row – the row to select
section – the section containing the row. (Ignored on Android).
Where row and section are arguments and both args should be integer.
ScrollToRow(by Value) Scroll to a row by value.
value (int)- the value of the row to scroll to.
SetEditing Enable/disable table editing. iOS: Enabled editing mode for table. Android: ignored. N/A on Android.
Insert Insert a row into the table. iOS: Inserts a row. Android: Ignored. N/A on Android.
Remove Remove a row from the table.  iOS: Deletes the row. Android: Ignored. N/A on Android.
Move Move a row. iOS: Moves a row. Android: Ignored N/A on Android.
SelectIndex Selects an item by index. Table * SelectIndex 3
Where 3 is item no i.e index and index should be integer.
LongSelectIndex Long press an item by index. Table * LongSelectIndex 4
Where 4 is item no i.e index and index should be integer.
View verify Verifies that a property of the component has some expected value.If  Expected value is null then it  verifies the existence of the component. Syntax: ComponentType MonkeyId  Verify arg
where for argument pass expected value for verification and componenttype can be any component of monkeytalk like label,button,tabbar etc.
Example: Label #1 Verify “Welcome, test!” %thinktime=8000
Label LOGOUT Verify LOGOUT %thinktime=3000
or
View  LOGOUT Verify LOGOUT %thinktime=3000
verifyNot Verifies that a property of the component does not have some value.If  Expected value is null then it  verifies the non-existence of the component. ComponentType MonkeyId  VerifyNot arg
Label LOGOUT VerifyNot Login %thinktime=3000
or
View LOGOUT VerifyNot Login %thinktime=3000
verifyRegex Verifies that a property of the component matches some regular expression.
verifyNotRegex Verifies that a property of the component does not have a value matching a regular expression
verifyWildcard  Verifies that a property of the component does have a value matching some wildcard expression
verifyNotWildcard  Verifies that a property of the component does not have a value matching some wildcard expression
Get Retrieves a property value from the component Syntax: ComponentType MonkeyId Get Variable PropPath
Example: Button LOGIN Get b :text
Label #1 Get a
Tap Taps on the component. On Android, plays a “click”. On iOS, plays a TouchDown/TouchMove/TouchUp sequence. Button LOGOUT Tap
Swipe Swipe(scroll)  the component in direction Left, Right, Up, or Down (case insensitive) WebView webview swipe Down
Table * Swipe Up
Slider * Swipe Right
Drag Touch down, drag across the component, then up Input username Drag 43 154 181 162
where 43 and 154 are x1,y1 i.e starting cordinates and 181 & 162 are x2,y2  i.e ending cordinates.
TouchDown Start touching the component. Input username TouchDown 43 154
where 43 and 154 are x and y cordinates of touch and x,y should be integer.
TouchMove Drag across the component.
one or more (x,y) coordinate pairs specifying the path of the drag gesture
Input username TouchMove 146 170
TouchUp Stop touching the component Input username TouchUp 43 154
where 43 and 154 are x and y cordinates of touch where touch is released and x,y should be integer.
Pinch Pinch the component.
scale – The scale factor relative to the points of the two touches in screen coordinates
velocity – The velocity of the pinch in scale factor per second (read-only)
Exec Call a method on a component. The method must take zero or more String arguments and return a String result. Not implemented yet by gorilla logics.
LongPress Performs a long press on the component. On Android, plays a “longClick”. On iOS, plays a longPush gesture View LOGOUT  LongPress
Button LOGIN  LongPress
ButtonSelector Select Select an item by value. ButtonSelector forms_radios select A
SelectIndex Selects an item by index.
LongSelectIndex Long press an item by index.
Input EnterText Enter text into the input field.
text – the text to enter
hitDone – iOS: if true, hit Done key after entering text. Android: ignored.
Where text and hitdone are arguments of entertext action.
Input username EnterText test
Clear Clear text from the input field Input username Clear
Script Run Run the script with the given args. Script test1.mt Run john “my password” %thinktime=3000
RunWith Run the script with the given CSV file. Script datdriven.mt RunWith credentials.csv
Slider Select Select a numeric component value Slider forms_slider_bar Select 52 %thinktime=3000
TabBar Select Select an item by value. TabBar * Select hierarchy %thinktime=1000
SelectIndex Selects an item by index. TabBar * SelectIndex 2 %thinktime=5000
LongSelectIndex Long press an item by index.
Vars Define Define the named variables used in the script. Vars * Define user pass
CheckBox On This action sets or returns the checked state of a checkbox. CheckBox forms_checkbox on
Off This action sets or returns the Unchecked state of a checkbox. CheckBox forms_checkbox off
ItemSelector Select Select an item by value. ItemSelector * Select Carbon
SelectIndex Selects an item by index. ItemSelector * SelectIndex 8
LongSelectIndex Long press an item by index. ItemSelector * LongSelectIndex 8
Button Tap Taps(click) on the Button. On Android, plays a “click”. On iOS, plays a TouchDown/TouchMove/TouchUp sequence. Button LOGOUT Tap
DatePicker EnteDate Change the current date value.
A date with the format YYYY-MM-DD where YYYY is the year, MM is the month (01-12), and DD is the day (01-31).
NumericSelector select Select a numeric component value
RatingBar select Select a numeric component value
Scroller scroll Scroll to the specified coordinates.
x – the x-coordinate (horizontal)
y – the y-coordinate (vertical)
TextArea EnterText Enter text into the input field.
text – the text to enter
hitDone – iOS: if true, hit Done key after entering text. Android: ignored.
Where text and hitdone are arguments of entertext action.
TextArea * enterText “This is a textarea”
Clear Clear text from the input field TextArea * Clear
ToolBar SelectIndex Selects an item by index.
LongSelectIndex Long press an item by index.
VideoPlayer Play Play the video from the current playback point.
Pause Stop the video at the current playback point
Stop Stop the video and set playback to the starting point.
Menu Select Select an item by value. Menu * select About
Verify Menu * Verify About
SelectIndex Selects an item by index.
LongSelectIndex Long press an item by index.
Doc vars Document the named variables used in the script.
script Document the script itself.
Label All methods of view are applicable on label. Label #1 Verify “Welcome, test!”
Label LOGOUT VerifyNot LOGIN
Setup Run Run the setup script with the given args. SetUp login.mt run john “my password”
RunWith Data-drive the setup script with the given CSV data file. SetUp login.mt runwith cre.csv
(where the first arg is the data file filename )
Teardown Run Run the teardown script with the given args TearDown logout.mt run
RunWith Data-drive the teardown script with the given CSV data file. TearDown logout.mt runwith logout.csv
Test Run Run the test script with the given args. Test testcase1.mt run
RunWith Data-drive the test script with the given CSV data file. Test testcase1.mt runwith login.csv
Toggle On Enabled the switch on. Toggle MonkeyId On
Off Disabled the switch. Toggle MonkeyId Off

List of MonkeyTalk Component Types:

MonkeyTalk Android IOS
Device Device Device
Table ListView UITableView
View View View
ButtonSelector RadioGroup UISegmentedControl
Input EditText UITextField
Script
Slider SeekBar UISlider
TabBar TabHost UITabBar
Vars
CheckBox CheckBox UISwitch
ItemSelector Spinner UIPicker
Button Button UIButton
DatePicker DatePicker UIDatePicker
NumericSelector
RatingBar Slider RatingBar
Scroller Scroller UIScrollView
TextArea TextView UITextView
ToolBar ActionBar UIToolBar
VideoPlayer VideoView MPMoviePlayerController
Menu Menu TabBar
Doc
Label TextView UILabel
Setup
Teardown
Test
Toggle ToggleButton UISwitch

Installation of any App in Emulator:

Installing App in Emulators need the .apk file which we can find in the sameproject folder.

Path of the .apk file: workspace> project> bin\

There are different ways of installing Android App (.apk file) in emulators as mentioned below:

Way 1: If we are using Eclipse version 3.7.2, then on executing the Android project in Eclipse (without throwing any error) will automatically install the App (.apk file) in emulator (make sure the Emulator is open while executing the Eclipse Android project).

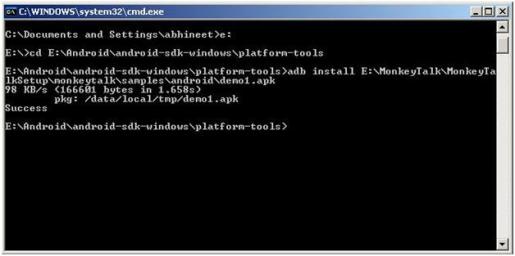
Way 2: We can also install the Android App (.apk file) through ‘adb’ (Android Debug Bridge).

adb is a versatile command line tool that lets you communicate with an emulator instance or connected Android-powered device.

Path of adb: Drive\android-sdk-windows\platform-tools

‘adb’ used for installing any App in Android. As per mentioned command in screenshot is used for installing any app.

Installation Command is:

adb install demo.apk

[adb( command) install (command) demo.apk (path of.apk file of  demo android project)]

have a look on sceenshot for reference:

Note: Emulator should be already opened while installing any App into Emulator

Setup Process for Eclipse and Monkey Talk:

In order to start with Mobile App testing, there are some pre-requisites software/packages which we need to install/unzip on machine.

Pre-requisites:

•   Eclipse setup

•   Android SDK setup

•   ADT Plug-in for Eclipse

•   Monkey Talk Tool (Testing tool for Mobile Apps Testing)

•   AJDT (for AspectJ conversion)

Eclipse:

Download Eclipse from URL:

http://www.eclipse.org/downloads/

Version: Eclipse Classic 3.7.2 (Windows 32 Bit)

No need to install the Eclipse, just unzip the downloaded folder anywhere in local drive. That will provide the ‘eclipse.exe’ which will open the Eclipse framework.

On opening the Eclipse framework, it will ask for the location of ‘workspace’ folder (‘Workspace’ is the location where the entire Eclipse project will be saved). Make any workspace folder anywhere in your machine and give the location.

Now Eclipse has successfully configured. Now we can open Eclipse, write any program and can save program to workspace folder.

Android SDK setup:

We need to setup and configure Android with Eclipse. Basically it is for development process but in case if we need to check how’s the application behave we can have a look on such the application in eclipse.

Download Android-sdk-windows (android-sdk_r18-windows) from the following URL:

http://developer.android.com/sdk/index.html

No need to install the Android, just unzip the downloaded folder (android-sdk_r18-windows) anywhere in local drive. That will provide the ‘SDK Manager.exe’ (which will open the Android SDK Manager) and ‘AVD Manager.exe’ (which will open the AVD Manager).

a ) SDK Manager: used for installing the Android packages

  • Run the ‘SDK Manager.exe’ (can be found in the ‘android-sdk-windows’ folder)
  • Android SDK manager will provide the list of package to install
  • Install any of the package (like Android 4.0.3 (API 15))

b) AVD Manager: used for creating the Virtual Device (emulator)

•Run the ‘AVD Manager.exe’ (can be found in the ‘android-sdk-windows’ folder)

•‘Android Virtual Device Manager’ window will be open.

•Click on New> and follow the steps as shown in below screenshot:

Name: name of Virtual device (or emulator

Target: version of Android emulator which you are going to use

CPU/ABI: for Android, use ARM

SD Card ‘Size’: it could be 512MB or 1GB

Snapshot: checked (best practice) [It will keep the track if any activity killed or process crashed, if its enabled we can restore the session ]

Skin ‘Built-in’: HVGA (for Android)

Click on ‘CreateAVD’. It will create the AVD which will be seen in ‘Android Virtual Device Manager’ under ‘AVD Name’ section.

Select the AVD name and click on ‘Start’. ‘Launch Option’ pop-up will be open. Then click on ‘Launch’.  It will open the Android emulator.

ADT plug-in for Eclipse:

ADT plug-in extends the capabilities of Eclipse to let you quickly set up new Android projects, build an app UI, debug your app, and export signed (or unsigned) app packages (APKs) for distribution.

To install ADT plug-in:

• Start Eclipse> Help > Install New Software….

• Click Add, in the top-right corner.

• In the Add Repository dialog that appears, enter “ADT Plug-in” for the Name and the following URL for the Location:

•  https://dl-ssl.google.com/android/eclipse/

• Click OK

Restart the Eclipse. It will ask for the Android SDK (which is we have already install as above mentioned steps) so Just give the location of Android SDK path.

Now while looking on the Eclipse, TWO newly added icons will be shown.

These TWO icons are for ‘AVD Manager’ and ‘Android SDK Manager’.

Now Eclipse is configured with Android SDK.

Monkey Talk:

Monkey Talk can be downloading from the below address:

http://www.gorillalogic.com/testing-tools/monkeytalk/download

Pre-requisit for installing Monkey Talk Agent:

For installing the Monkey Talk Android Agent, first we need to convert Android project into AspectJ.

For doing so, we need to configure AJDT in Eclipse by following steps:

Eclipse> Help> Install New Software > Click on Add…

In ‘Add Repository’ popup:

Name: AJDT

Location: http://download.eclipse.org/tools/ajdt/37/update

Click Ok. It will configure the AJDT with Eclipse.
Android App Test Cases (UI Related Scenarios):

  • Verified that Alignment should be proper.Expected result: Alignment should be proper.
  • Check each and every buttons, images Pixels as per wire frame/page schematic or screen blueprint.Expected result: Dimensions must be same as defied in wireframe.
  • Verify that Proper images size displayed in well manner with Orientation.
  • Verify that all Spell check are correct on Alert, error popup,Error messages etc.
  • Verified that Spinner (Size, Types) should be suitable as per screen.
  • Verify that application Logo should not be blurred and App title should not be misspelled (Means whole logo text should be displayed))
  • Verify that Font size should be consistent.
  • Verify that any kind of text should not be cutting off.
  • Verify that any kind of graphics should not be blurred, Check with different resolution Devices (Like BB have Different resolution for all devices, iPhone 3Gs or iPhone 4)
  • Verify that application must not perform inappropriate actions while thinking or rendering by making user input while the application or handset is busy processing or rendering.There must be no inappropriate reaction by the Application.
  • Verify that On Taping (Single Tap) Application Logo , Application Splash should display.
  • Verify that Application Splash Should not display More than 4 Second
  • Verify that there is visual feedback when response to any action takes more than 3 seconds.
  • Verify that each screen should be visible for the time necessary to comfortably read all its information by moving between screens of an application. Each screen must be visible for the time necessary to comfortably read all its information.
  • Verify that error messages in the Application must be clearly understandable.
  • Verify that error messages must clearly explain to a user the nature of the problem, and indicate what action needs to be taken (where appropriate).
  • Verify that any function selected in the Application should start within 5 seconds.
  • Verify that there must be some visual indication that the function is being performed like
     – prompting for user input;
    – displaying splash screens or progress bars;
    – displaying text such as “Please wait…”, etc
  • Verify that If the screen requires data entry on a specific field, should identify the required fields with a red asterisk and generate a friendly warning if the data is left blank
  • Verify that If the screen contains dates, numeric, currency or other specific data types, ensure that only valid data can be entered.
  • Verify that If the screen contains text boxes that allow data entry, ensure that the width of data entered does not exceed the width of the table field.
  • If the information in the screen is not self-explanatory to the casual user, should provide onscreen instructions to aid the user.
  • If the screen takes more than 5 seconds to display the results/page, it should contain a progress bar so that the user understands the processing is continuing.
     
  • The screen look, feel, and design should match the other screens in your application. (Application should match with the Wireframe or design document provided).
     
  • If the screens contain abbreviations (e.g. Nbr for number, Amt for amount, etc), the abbreviations should be consistent for all screens in the application.
     
  • If the screen allows changing of data without saving, it should prompt users to save if they move to another record or screen.
  • If a person deletes an item, it is a good idea to confirm the delete. User should be prompted with confirmation alert.
     
  • If the user interface uses combo boxes (drop down lists), be sure to include type ahead (if there are hundreds of items in a list, users should be able to skip to the first item that begins with that letter when they type in the first letter).
     
  • Ensure the test cases look for grammar or spelling errors.
     
  • If the application lists information in table format and the data in the table extend past one page, the scrolling should scroll the data but leave the table headers intact.
     
  • If fatal errors occur as users use your application, ensure that the application writes those errors to a log file, event viewer, or a database table for later review. Log the routine the error was in, the person logged on, and the date/time of the error.
     
  • Ensure that error messages are informative, grammatically correct, and not condescending.
     
  • If the application allows short cut keys for copy/paste etc, should test each and every short cuts
     
  • Do not show menu items that are not available for the context users are currently in.
  • Use a style guide to document what choices are available for dialog boxes. Application should not have Save/Cancel dialog on one screen and an OK/Cancel on another. This is inconsistent.
  • Ensure that the screen font family matches from screen to screen. Mismatching fonts within the same sentence and overuse of different fonts is not allowed.
     
  • Ensure that the screen font sizes match from screen to screen. A good user interface will have an accompanying style guide that explicitly defines the font type and size for headers, body text, footers, etc.
  • Ensure that screens do not use different color sets as to cause an inconsistent.style guide should define header colors, body background colors,screen background color, footer colors, etc.
  • Ensure that icons are consistent throughout your application by using a common icon set. For example, a BACK link that contains an icon next to it should not have a different icon on one screen versus another. Avoid free clip-art icons.
  • Ensure that narrative text appears at the same location on the screen on all screens.
  • Ensure that narrative text, error messages and other instructions are presented in laymen’s terms but are brief and to-the-point.
  • If your application has links on the screen (e.g. Save as Spreadsheet, Export, Print, Email, etc.), ensure that the links have consistent spacing between them and other links, that the links appear in the same order from screen to screen, and that the color of the links are consistent.
  • If your application has menu items, ensure that menu items that are not applicable for the specific screen are disabled and the order in which each menu item appears is consistent from screen to screen.
     
  • If your application has buttons (e.g. Submit, OK, Cancel, etc), ensure that the buttons appear in a consistent order from screen to screen (e.g. Submit then Cancel).
  • Tabbing will go onto the next field on the screen

Test cases for android app testing:

Memory Related Scenarios:

1. Fill up the Full phone memory with other files and data, and then try to install the APP on the phone.

Expected Result: The APP should not get installed on the phone and the user should be shown a native warning from the phone OS.

2. Fill up the memory with files and data and leave exactly the same amount of memory required for the installation of the APP.

Expected Result: APP should get installed on the phone, but as you launch the APP the phone should refuse as it doesn’t have even 1 KB of extra space that the APP might require to cache some data.

3. Leave only a small amount (5-7 KB) of space for the app to run. While you are in the app and continuously making server calls this memory will also get filled up.

Expected Result: The app should give a warning stating low memory.

Note: Checking point number 3: Ensure that there is no memory card in the phone. You can fill up the memory using Image files. You can also re size the images to so that 5-7 KB of memory is left out.

Some general Scenarios:

Application start/stop behavior-

1. Start the application by selecting the icon or following the steps outlined in the submission statement. Navigate to the Task Manager and check that the application appears there.

Expected Result: The app should be appearing in task manager.

2. Close the application from within the application UI and then return to the Task Manager. Navigate to the Task Manager and check that the application appears there.

Expected Result: The application must no longer be running and must no longer appear in the task manager.

3. An application which must run in the background does not need to appear in the Task Manager or present a UI.

Note: Developer justifies/Provide this behavior during submission.

Application credentials:

1. With the application running, check the name of the application displayed on the phone. The application must display the same name on the phone as stated during submission.

Expected Result:  The application must display the same name on the phone as stated during submission.

No disruption to text messages:

1. With the application installed and running, send a text message to the test device.

Expected Result:  The incoming text message must be notified to the user as per their alert settings.

2. Read the text message on the test device and choose to reply. Send the reply.

Expected Result: The reply must be received at the second device.

3. From the standby screen on the test device, navigate to the “new text message” option and create a new message. Send the message to the second device.

Expected Result: The message must be received at the second device.

Auto-start behavior:

1. With the application running, find the settings for the application — either within the application itself or from the settings option on the device.

Expected Result: There must be an option which allows the user to enable/disable auto-start functionality.

Note: Depends upon application.

2. Ensure that the setting for auto-start behavior is disabled, and restart the device.

Expected Result: The application must not start on device boot.

Connecting MonkeyTalk IDE to Emulator, Simulator, or Real Device:

MonkeyTalk IDE appears as:

MonkeyTalk IDE is desktop app for record/playback/creation of test scripts.

Android Emulator / iOS Simulator:

  • Open the IDE.
  • Start up your Android or iOS emulator/simulator and load it with your MonkeyTalk enabled app.
  • Click on the connection dropdown button on the tool bar (on initial start up it will be the green android icon).

  •  Choose an option from connection dropdown with which you want to connect IDE.

Note: If you are connecting to an Android device for the first time, you will be prompted to point the MonkeyTalk IDE to your local Android SDK. Check the “Include Android Testing?” checkbox and point it to the SDK. You can also set this in your MonkeyTalk Preferences.

  • If connection was successful, a message to that effect should appear in the console.

Android and iOS Real Device:

  • Open the IDE
  • Start up your Android or iOS device, connect it to your local wireless network, and load it with your MonkeyTalk enabled app.
  • Click on the connection dropdown button on the tool bar (on initial start up it will be the green android icon).
  • Choose “Networked Android or iOS device.
  • Enter the IP address of the mobile device.
  • If connection was successful, a message to that effect should appear in the console.