Posts Tagged ‘Emulator’

Steps to record actions from emulator to MonkeyTalk IDE:

1. Open Eclipse.

2. Import project in eclipse and convert it to AspectJ by following steps mentioned on “https://tfortesting.wordpress.com/2012/08/31/steps-to-install-monkeytalk-android-agent/ “link.

3. Open Emulator.

4. Deploy your application to an Android device or emulator.

     Right click on Android project

     Choose “Run as” option and then “Android Application”

5. Open app in emulator for which you want to record script.

6. Open MonkeyTalk IDE and Click on the connection dropdown button on the tool bar (on initial start up it will be the green android icon).

7. Choose “Android Emulator” or “iOS Simulator”.

8. If connection was successful, a message to that effect should appear in the console.

9. In case record button is not visible to you can try

     Create a new AVD (emulator)

     Install a fresh app in emulator

     Stop and restart the server by:

     adb kill-server

     adb start-server

10. Create a MonkeyTalk project in MonkeyTalk IDE.

11. Then Create script under this MonkeyTalk project and Click on record button.
Installation of any App in Emulator:

Installing App in Emulators need the .apk file which we can find in the sameproject folder.

Path of the .apk file: workspace> project> bin\

There are different ways of installing Android App (.apk file) in emulators as mentioned below:

Way 1: If we are using Eclipse version 3.7.2, then on executing the Android project in Eclipse (without throwing any error) will automatically install the App (.apk file) in emulator (make sure the Emulator is open while executing the Eclipse Android project).

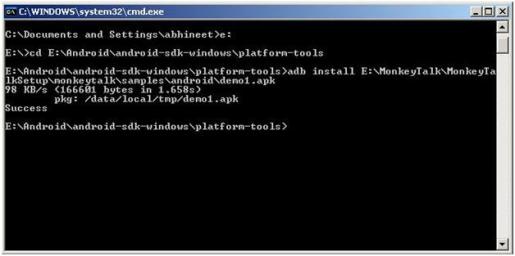
Way 2: We can also install the Android App (.apk file) through ‘adb’ (Android Debug Bridge).

adb is a versatile command line tool that lets you communicate with an emulator instance or connected Android-powered device.

Path of adb: Drive\android-sdk-windows\platform-tools

‘adb’ used for installing any App in Android. As per mentioned command in screenshot is used for installing any app.

Installation Command is:

adb install demo.apk

[adb( command) install (command) demo.apk (path of.apk file of  demo android project)]

have a look on sceenshot for reference:

Note: Emulator should be already opened while installing any App into Emulator

Connecting MonkeyTalk IDE to Emulator, Simulator, or Real Device:

MonkeyTalk IDE appears as:

MonkeyTalk IDE is desktop app for record/playback/creation of test scripts.

Android Emulator / iOS Simulator:

  • Open the IDE.
  • Start up your Android or iOS emulator/simulator and load it with your MonkeyTalk enabled app.
  • Click on the connection dropdown button on the tool bar (on initial start up it will be the green android icon).

  •  Choose an option from connection dropdown with which you want to connect IDE.

Note: If you are connecting to an Android device for the first time, you will be prompted to point the MonkeyTalk IDE to your local Android SDK. Check the “Include Android Testing?” checkbox and point it to the SDK. You can also set this in your MonkeyTalk Preferences.

  • If connection was successful, a message to that effect should appear in the console.

Android and iOS Real Device:

  • Open the IDE
  • Start up your Android or iOS device, connect it to your local wireless network, and load it with your MonkeyTalk enabled app.
  • Click on the connection dropdown button on the tool bar (on initial start up it will be the green android icon).
  • Choose “Networked Android or iOS device.
  • Enter the IP address of the mobile device.
  • If connection was successful, a message to that effect should appear in the console.